Take deposits on Sesami appointment bookings, automate payment collection around booking dates, and protect against no-shows by holding a deposit upfront.
On this page:
Overview of the Integration
Setting up Sesami with Downpay
- Installing and configuring Sesami
- Installing and configuring Downpay
- Advanced payment collection with Sesami Flows
Overview of the Integration
The Sesami and Downpay integration enables merchants to take deposits or defer payment for appointment bookings. This setup is ideal for services and businesses who want to charge their customers upon rendering their service.
Setting up Sesami with Downpay
This section guides you through the steps to integrate Sesami and Downpay, ensuring both apps work together seamlessly on your Shopify store.
Installing and configuring Sesami
Installing and configuring Downpay
- Install Downpay from the Shopify App store (if you don't already have it).
- Create a purchase option.
- Check out our getting started guide for additional support.
Advanced payment collection with Sesami flows
Sesami and Downpay work seamlessly together when placed on the same product template in your Shopify theme editor.
Using Sesami Flows, you can design workflows that automate Downpay payment collection.
Sesami flow: Collecting remaining balance payment when customer checks in
- Navigate to the Sesami App in your Shopify admin
- Navigate to the
Flowssection of Sesami - Click
Create flowand then clickStart from scratchand use the following details:
Sesami flow configuration
Name: Whatever you wish to call the internal flow
Trigger: Customer checked in
Action: Webhook
Target: https://downpay.hypehound.app/graphql
When: Whenever you'd like the workflow to start
Webhook Template
For the Headers, you will need your Downpay API key which can be found in Downpay's settings page.
Headers
{"Content-Type":"application/json","Authorization":"Token yourdownpayapikey"}
Body
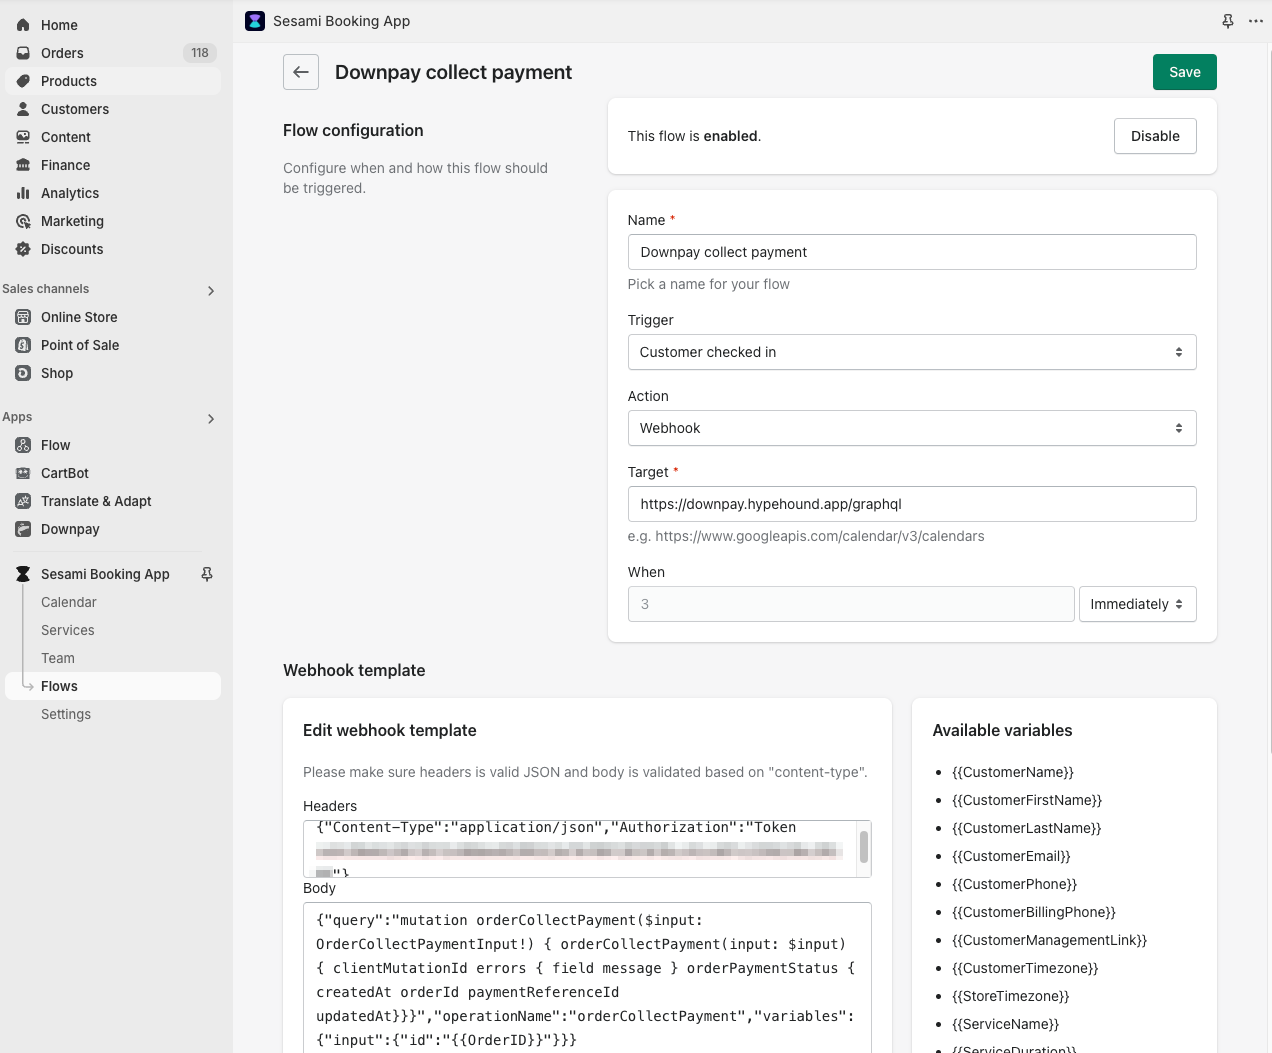
{"query":"mutation orderCollectPayment($input: OrderCollectPaymentInput!) { orderCollectPayment(input: $input) { clientMutationId errors { field message } orderPaymentStatus { createdAt orderId paymentReferenceId updatedAt}}}","operationName":"orderCollectPayment","variables":{"input":{"id":"{{OrderID}}"}}}
Example
Sesami flow: Collect a partial no-show fee
- Navigate to the Sesami App in your Shopify admin
- Navigate to the
Flowssection of Sesami - Click
Create flowand then clickStart from scratchand use the following details:
Flow Configuration
Name: Whatever you wish to call the internal flow
Trigger: Customer checked in
Action: Webhook
Target: https://downpay.hypehound.app/graphql
When: Whenever you'd like the workflow to start
Webhook Template
Headers
{"Content-Type":"application/json","Authorization":"Token yourdownpayapikey"}
Body
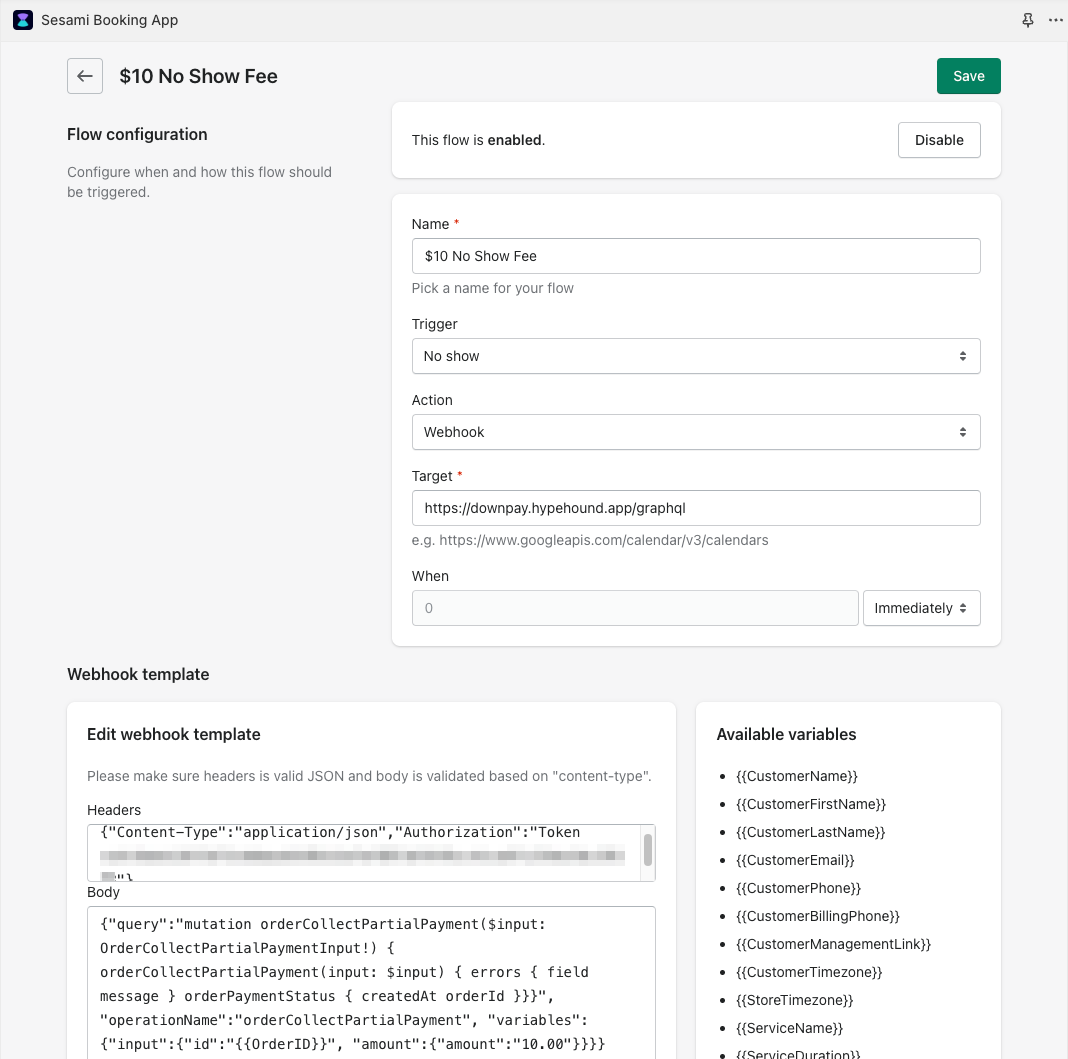
Note
Adjust the amount from 10.00 to whatever value is required so long as it does not exceed the total order balance due.
{"query":"mutation orderCollectPartialPayment($input: OrderCollectPartialPaymentInput!) { orderCollectPartialPayment(input: $input) { errors { field message } orderPaymentStatus { createdAt orderId }}}", "operationName":"orderCollectPartialPayment", "variables":{"input":{"id":"{{OrderID}}", "amount":{"amount":"10.00"}}}}
Example